What set Alectrona apart was the documented design pack. We had quotes from three installers, but only Alectrona handed us a full set of drawings, a single-line diagram and a design referencing BS 7671 and the G99 connection process. The whole thing read like an engineering submission rather than a sales brochure. Our M&E consultant reviewed it and signed it off without a single query. That gave the board the confidence to release the capital.
Alectrona
Commercial guideHow solar mounts on a standing-seam metal roof
A standing-seam roof takes an array through clamps that grip the raised seam, so the weathering layer is never drilled, and the design is confirmed by the structural survey and the PV*SOL model for your roof.
- Survey-led, structure confirmed
- Non-penetrative where possible
- Over 50 kWp, outside MCS
The feedback we work to earn
These are representative example reviews, not yet-collected customer feedback. They are written to illustrate the kind of feedback Alectrona aims to earn and are shown as design placeholders while we gather and verify reviews from our first commercial clients. Alectrona is the commercial solar trading brand of RVTC LTD.
Other firms priced our roof off a satellite image and a desktop guess. Alectrona flew an in-house drone survey, fully insured and flown by a qualified commercial drone pilot, and built a 3D model of the actual roof. It picked up plant, vents and a parapet line that a flat aerial photo had completely missed, which changed the panel layout. I would rather find that out at design stage than on the day the scaffold goes up. The accuracy of that survey is the reason I trusted everything that followed.
As a finance director I was wary of being oversold a system bigger than we could use. Alectrona modelled the array against our actual half-hourly consumption data rather than an annual total, so it is sized to what we genuinely draw on site during the day. They were honest that exporting surplus is worth far less than self-consumption, and built the design around that. The capital case stacked up because the engineering was honest, not because the numbers were inflated.
We were undecided between buying outright, leasing and a PPA. Alectrona laid out all three side by side with the pros and cons of each against our balance sheet, instead of pushing the one that pays them best. They were clear about where a PPA makes sense and where capex wins, and pointed us at our own accountant for the tax treatment. The survey and design took a little longer than I expected, but the thoroughness was worth the wait. Genuinely consultative.
The install crew were tidy and well run, and worked to a clear CDM 2015 plan with a proper site induction and RAMS. What impressed me most was the handover. We received a full commissioning pack with the IEC 62446-1 test results, certification, O&M documentation and an as-built record for our maintenance team. As the people who have to live with this asset for the next twenty years, having that paperwork in order matters enormously. Nothing was left loose.
I expected the usual hard sell and got the opposite. After surveying our site Alectrona told us one roof section was not worth covering because of shading, and that a smaller, well-sited array was the better investment than filling every square metre. There was no commission-driven upselling and no pressure. For a six-figure capital project, that straight talk is exactly what you want from the people advising you. We will be using them again on our second site.
- Mounting method Non-penetrative clamps that grip the raised seam, no holes through the covering
- Versus flat roof A flat roof uses a ballasted, weight-held frame instead of seam clamps
- What confirms it Seam profile, structural check and the PV*SOL model for your roof
- Module choice Bankable brands, cell technology and bifacial matched to your roof
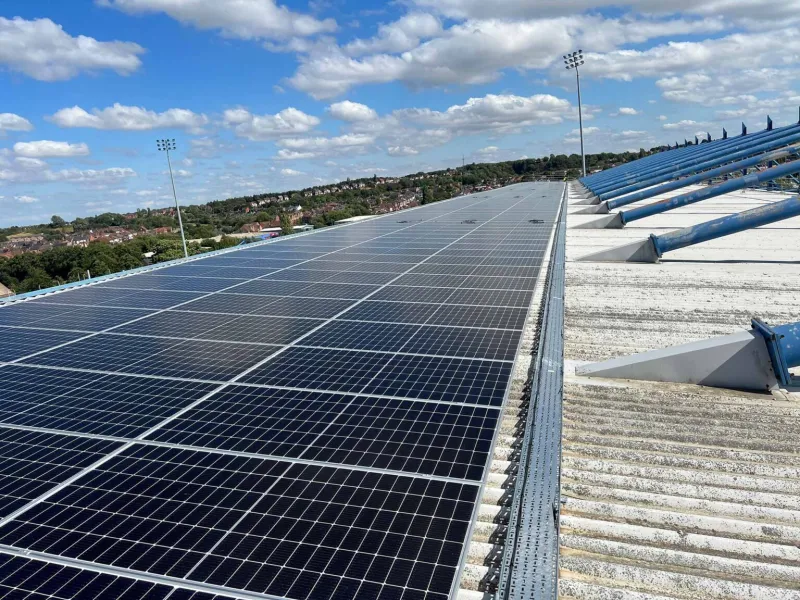
A standing-seam metal roof carries its weatherproofing on raised vertical seams that join one sheet to the next. That detail is the reason it suits solar well. The array is held by clamps that close onto the upstand of each seam, so the fixing grips the metal without a single hole through the covering. The roof keeps its watertight line and, in most cases, its manufacturer guarantee, because nothing penetrates the sheet.
This page explains the non-penetrative clamp method, how it differs from the ballasted approach used on a flat roof and the through-fixed approach used on a trapezoidal profile, and what the survey has to confirm before any clamp is specified. For a system over 50 kWp the assurance comes from a structural check, the seam geometry recorded on site and a yield model built for your roof, not from a figure quoted from a desk.
The fixing follows the roof, confirmed by the structural survey.
The clamp method: a fixing that grips the seam without drilling
On a standing-seam roof the mounting clamp is shaped to match the seam profile and is tightened onto the raised upstand. The array rails sit on these clamps, and the load passes from the modules into the rails, into the clamps and into the seams the roof is already built around. No part of the assembly breaks the surface of the sheet, so there is no new path for water and no disturbance to the existing weathering detail.
This is the main reason a standing-seam roof is a strong candidate for solar. A through-fixed method puts sealed fasteners through the covering, which is the standard approach on a trapezoidal profile but is avoided here because the seam offers a cleaner, non-penetrative hold. The clamp pattern, the spacing along each seam and the load each clamp may carry are set against the seam profile measured on site and the manufacturer's data for that roof system, and confirmed by the structural survey for your roof.
How it differs from a ballasted flat roof
It is worth separating the two methods, because they are often confused. A standing-seam roof is pitched and uses clamps that grip the seam. A flat roof generally uses a ballasted system, where the array sits in a frame held down by weight, usually concrete blocks or pavers, rather than by any fixing into the deck. Ballasted mounting is non-penetrative too, but it works by mass and friction, not by clamping a seam, and it places a distributed dead load across the roof that the structure has to be checked against.
The two roofs therefore raise different structural questions. A standing-seam design has to confirm the seam can carry the clamped load and the wind uplift across the array. A ballasted design has to confirm the deck can carry the added ballast weight as well as the wind load. Which method applies to your building, and what it asks of the structure, is established by the survey rather than assumed from the roof type alone.
What the survey has to confirm
The clamp method is sound in principle, but the numbers behind it are specific to your roof. The survey records the detail that the design depends on, and nothing is committed to until it is in hand.
- Seam profile and condition. Standing-seam systems vary by manufacturer and age, and the clamp has to match the exact seam shape. The drone survey and a close inspection record the profile and the condition of the metal.
- Structure. The roof and its supporting frame have to carry the array and resist wind uplift. A structural engineer confirms the seam and the structure are adequate, or identifies any strengthening, on the basis of the loads modelled for your roof.
- Layout and access. Seam spacing sets where rails can run, which shapes the array layout, the cable routes and the access plan for installation and maintenance.
- Manufacturer position. Where the roof is under a current guarantee, we check the roof maker's stance on non-penetrative clamps so the covering's warranty is protected.
These are engineering principles applied to real measurements. The load each seam can take, the clamp spacing and the array size are confirmed by the structural survey and the PV*SOL model for your roof, never quoted as a universal number.
Choosing the modules for the roof
Once the mounting method is settled, the module choice follows the roof and the load rather than a house default. We specify from the bankable, market-leading brands and match the cell technology to the geometry and shading recorded on site. N-type TOPCon, heterojunction and back-contact modules each have their place, and we choose between them on the merits of your roof rather than declaring any one of them best for every site.
Bifacial modules are a roof-specific decision. They pick up reflected light from the surface behind the array, so a bright standing-seam finish can return a useful rear-side gain where a dark roof would return little. That gain depends on the seam colour, the reflectance and the mounting height, so we model it in PV*SOL for your roof rather than assume it, and specify bifacial only where the model shows it pays.
How the wind load is resolved into the seam
The force that governs a standing-seam design is not the dead weight of the modules but the wind. A pitched array presents a surface the wind pushes against, and the dominant case is uplift: a suction that tries to peel the array off the roof, strongest at the eaves, ridge and verges where the airflow accelerates around the building edges. The clamp method has to hold the array down against that suction and pass the reaction back into the seams without the clamp sliding along the upstand or the seam deforming under the grip.
Two distinct capacities therefore have to be satisfied at once. The first is the slip resistance of the clamp on the seam, the force at which the clamp would begin to move along or release the upstand, which the clamp maker publishes for each seam profile and tightening torque. The second is the seam's own strength, the load at which the upstand itself would distort. Both are checked against the uplift the array will see, with extra clamps or tighter spacing brought in at the high-suction edge zones where the loads concentrate. The wind pressures themselves come from the building's location, height and exposure, not from a single national figure, which is why the loading is calculated for your roof rather than read off a table. The structural survey turns that into a clamp count and a spacing the seam can demonstrably carry. The same uplift logic is set out for ballasted work on our flat-roof mounting page, where mass rather than a clamp does the holding.
The standards and the survey that govern the design
A commercial standing-seam array is an engineered structure and an electrical installation at once, so two bodies of standard apply. On the electrical side the array, its DC strings, isolation and earthing are designed and tested to BS 7671, the IET Wiring Regulations, with the photovoltaic-specific guidance that sits alongside it. On the structural side the wind and snow actions on the array, and the way those actions are carried by the clamps, the seams and the building frame beneath, are assessed by a structural engineer against the relevant loading codes for the site. Because the work is above 50 kWp it falls outside the domestic MCS scheme, so the assurance comes from this engineering and standards stack rather than a consumer certificate, a point we set out in full on quality assurance without MCS.
None of it is generic. The survey records the live seam profile, the metal's gauge and condition, the purlin or rafter spacing that supports the sheet, and the building's exposure, then the engineer confirms the seam and the structure are adequate or specifies what strengthening is needed. The construction itself is run under the CDM 2015 duties because the array is built at height on a working roof. What you sign off is a clamp pattern, a layout and a structural sign-off grounded in your roof's measured detail, which is also why we never commit a design before the survey is in hand.
The failure modes the design is built to avoid
Knowing how a standing-seam mount can fail is what makes the survey worth running, because each mode maps to something the design controls. Clamp slip is the first: a clamp tightened below its specified torque, or fitted to a seam profile it was not shaped for, can creep along the upstand under repeated wind cycling. The defence is matching the clamp to the exact seam and torquing it to the maker's figure, both confirmed on site. Seam fatigue is the second: an undersized clamp count concentrates load on too few seams, so the design spreads the array across enough clamps that no single seam is overworked, with the edge zones reinforced.
The remaining modes are about the roof rather than the array. Galvanic corrosion can occur where dissimilar metals meet, so the clamp material and any fixings are chosen to be compatible with the roof sheet. An older or thin-gauge covering may simply lack the strength the clamp method assumes, which the condition survey catches before a clamp is ever specified, and on a tired roof the right answer can be to recover the sheet first. Thermal movement is designed for too, because a metal roof expands and contracts and the rail layout has to let it move without loading the array. Each of these is an engineering check on real measurements rather than a figure carried over from another building.
Which standing-seam roofs suit solar, and which need a closer look
Most genuine standing-seam roofs are good candidates, but the method is not universal across everything that looks like one, so the roof type is established before the design. A true mechanically-seamed or snap-fit standing-seam profile in sound metal is the strongest case: the upstand is built to be gripped, the clamp is non-penetrative and the covering keeps its warranty. Aluminium and steel seam systems both take clamps, with the clamp and fixings matched to the sheet material to avoid the corrosion modes above.
Some roofs that resemble standing-seam behave differently. A clip-fixed seam where the sheet is held to the structure by concealed clips needs the engineer to confirm the clip and the seam can together carry the clamped load, since the seam is not gripped in isolation. A trapezoidal profile is a separate case altogether, taking a sealed through-fixing rather than a seam clamp, which we cover on the trapezoidal metal roof page. A roof with a current manufacturer guarantee needs the maker's position on non-penetrative clamps checked so the covering's warranty is preserved. The survey settles which of these your roof is, and the module specification then follows the roof and the load, with the cell-technology trade-offs set out on TOPCon, heterojunction and PERC compared and the full range on our commercial solar panels page.
Standing-seam: common questions
No. A standing-seam array is held by clamps that close onto the raised seam, so the fixing grips the metal without penetrating the sheet. The weathering layer stays intact, which is the main reason this roof type suits solar. We confirm the clamp matches your exact seam profile during the survey.
Because the clamp method does not penetrate the covering, it usually protects the roof's watertight detail and its guarantee. Where the roof is under a current manufacturer warranty, we check the roof maker's position on non-penetrative clamps before specifying, so the covering's guarantee is not put at risk.
A standing-seam roof is pitched and uses clamps that grip the seam. A flat roof generally uses a ballasted system, where the array sits in a frame held down by weight rather than by any fixing. Both are non-penetrative, but one works by clamping the seam and the other by mass. They raise different structural questions, which the survey settles for your building.
That is exactly what the structural survey establishes. A structural engineer checks that the seam and the supporting structure can carry the clamped array and resist wind uplift, working from the loads modelled for your roof. Any strengthening is identified before anything is committed. We do not quote a load figure from a desk.
From the survey and the model. We specify from bankable, market-leading brands and match the cell technology, TOPCon, heterojunction or back-contact, to the geometry and shading on your roof, with no single type declared best for every site. Bifacial gain depends on the seam finish and reflectance, so we model it in PV*SOL for your roof rather than assume it.
There is no fixed price, because a standing-seam design is survey-led. The cost turns on the seam profile and condition, the clamp count and spacing the wind loading calls for, the array size and any roof strengthening the structural survey identifies, so a figure quoted before the survey would not be honest. We confirm the scope from the measured seam detail and the PV*SOL model, then price it. For how a commercial system is costed and what shapes the figure, see our commercial solar cost guide, and for the funding routes, including how capital allowances let you set the qualifying spend against profits, see commercial solar finance and capital allowances. Confirm the allowance position with your accountant.
The clamp method is one of the quicker mounts to install, because the non-penetrative clamps fix straight onto the seam with no drilling, sealing or curing time, so the on-roof phase is usually short for an array of a given size. The honest answer to the full timeline is that the design and approvals before installation set the programme more than the fitting does: the structural survey, the layout sign-off, any manufacturer warranty check and the grid connection through Northern Powergrid all run first. We set out a realistic schedule for your roof once the survey is in. For the typical sequence and what drives the lead time, see our guide on how long a commercial solar installation takes.
Get a commercial mounting assessment
Tell us about the roof or the site. We survey it, confirm the structure, then specify the mounting system that fits, with no penetrations where the roof allows.
- On-site 3D drone survey and structural check
- Non-penetrative where the roof allows
- Over 50 kWp, outside MCS